WordPress Backups
Virtuozzo Application Platform for WordPress provides a fully automated backup solution (based on the Restic software) for all the supported topologies. The platform lets you set up the process based on your needs via a clear and intuitive user interface.
The order of operation is the following:
- install preferred backup storage (via the account settings)
- set up the backup settings for the required WordPress instance (via the dedicated project settings)
- manage backup and restore processes via dedicated UI
Let’s go through the required steps in detail:
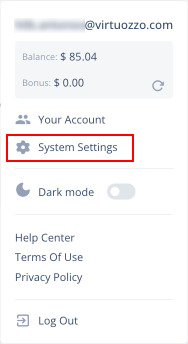
1. Log in to your Virtuozzo Application Platform for WordPress account and go to the System Settings in the top-right corner.
2. Switch to the Backup Storage section and click the Add Backup button to create new storage. Within the opened dialog, provide the following data:
- select the preferred backup storage option (tick the checkbox next to the name)
- if needed, enable annual and auto pay options
- set the number of storage nodes
- Provide the display name and domain
- choose the required region (if available)
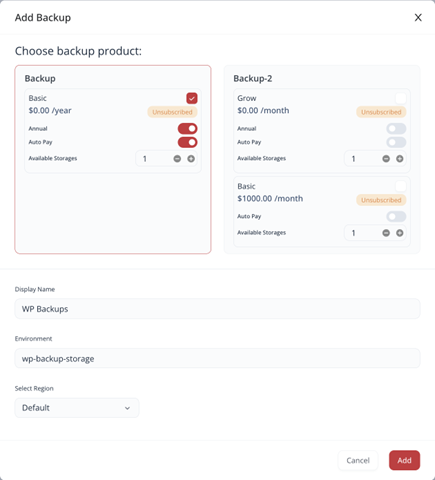
Click Add when ready. Your new storage product will be created in a few minutes.
3. Next, select the project you want to back up and click Settings (gear icon) in the top-right corner.

4. Go to the Backup Storage section and configure the backups schedule using the pre-defined, custom, or crontab tabs. Then, select the backup storage added earlier and set a number of the latest backups to keep.
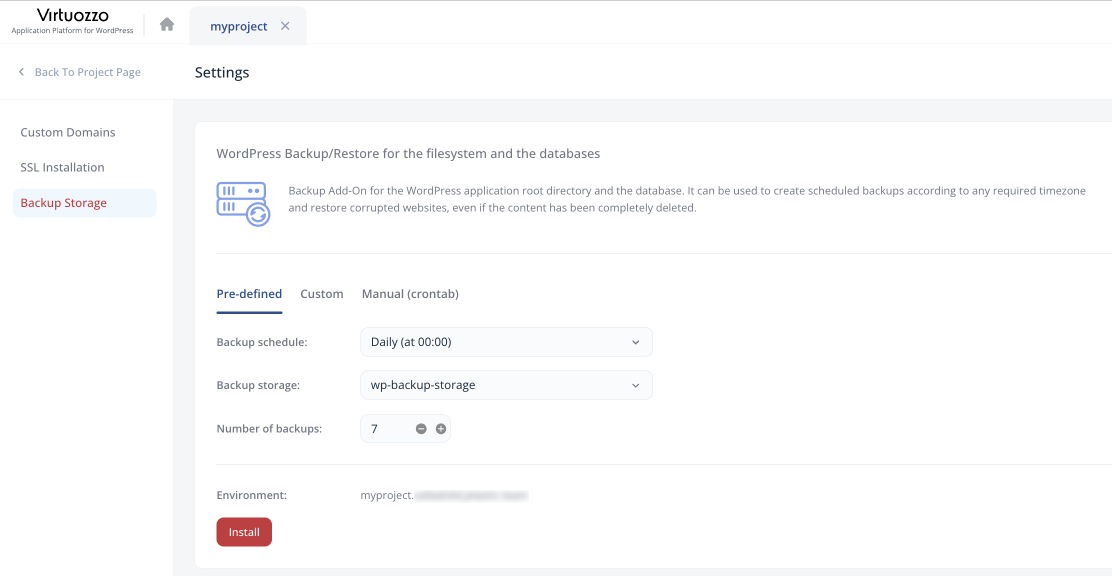
Click Install to apply.
5. That’s all. In a minute, you’ll see successfully configured backups. Use the buttons at the bottom to:
- Configure – adjust the schedule, storage node, and quantity of backups to store
- Backup Now – create an immediate backup
- Restore – restore from backup (choose the project and required backup in the pop-up)
- Delete – remove the backup solution for the project

Backup Process Specifics
Below, you can find information on the backup and restoration processes flow and specifics:
- the backup storage node is mounted to the WordPress instances only during the backup and restore processes (and unmounted afterward)
- during the backup operation, the Restic creates a snapshot that includes data from the /var/www/webroot/ROOT folder and the full database dump (made with the mysqldump utility)
- backups on the storage node have timestamps to make them easier to manage during restoration; also, snapshots are automatically rotated based on the backup number configured by the user - only the specified number of the latest backups is kept
- during the backup operation, the following directories are connected:
- on the backup storage node - all the backups are stored under the /data folder (every environment has its own subdirectory - /data/${env.name})
- on the compute node (application server) layer - the /opt/backup/ directory is used for backups
- during the restoration operation, the following directories are connected:
- on the backup storage node - the /data/${env.name} directory with backups of the appropriate environment
- on the compute node (application server) layer - the /tmp/restore directory is used to store initially restored data
- once data from the snapshot is restored to the application server, the corresponding environment is temporarily stopped to perform database restoration and webroot folder substitution