Virtual Networks
The Virtual Networks section manages cross-region tunnels (GRE + IPsec) that are required for connections between different regions. Here, you can see a list of all tunnels configured via the admin panel, add new, and manage existing ones.

The platform creates GRE tunnels with IPsec (libreswan) encryption to ensure network connection between regions. OSPF (BIRD) is used for traffic routing and balancing. Two standard virtual network topologies are recommended:
- Each region has tunnels to all other regions.
- Each region has tunnels to the “primary” region. Such interconnection through one central region is called star topology.
Creating two tunnels between the required regions is recommended to ensure fault tolerance and traffic balancing.
Adding New Tunnel
In order to Add a new tunnel, click the appropriate button on the tools panel of the Virtual Networks section.
1. You need to provide the following data in the opened dialog window:
- Left and Right Endpoint – gateway hosts between which the tunnel should be configured. Use drop-down lists to select.
- IPsec Mode – security mode for IP-based communication:
- Tunnel (the default option) - the entire IP packet is encrypted (including the original source and destination addresses). It ensures the best end-to-end security.
- Transport - only the payload of the IP packet is encrypted (not the header information such as the source and destination addresses). It provides higher compatibility and less overhead.
- TTL – maximum time to live for packets of the created interface (127 hops by default). Leave default or set custom TTL value.
- MTU – maximum transmission unit that can be communicated in a single transaction (1100 bytes by default). Leave default or set custom MTU value.
- Cost – a metric unit to make routing decisions. The lowest-cost path to the destination is preferred. Will be applied for routes between regions (15 by default). Leave default or set custom cost value.
- OSPF Area - a logical grouping of routers. The area has to be the same for all tunnels. It can be 0 if you use the backbone area or any other value (greater than 0, 1 by default) if you use the same area for tunnels and OSPF inside regions. Leave blank for the platform to choose the default area.
- OSPF Key – IPsec host key. Leave blank for the platform to generate an authentication key automatically. The setting requires manual adjustment only if several keys are on the host and the platform selects the incorrect one.
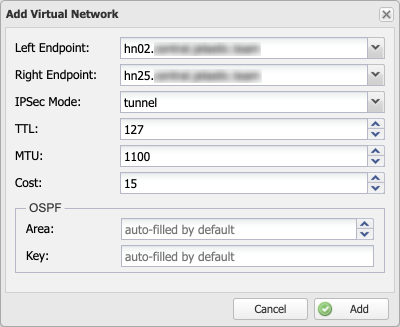
Click Add to save changes.
2. Now, the tunnel is added to the admin panel but has not yet been applied to the platform. Proceed to making any other adjustment to the virtual network and click Publish Configuration from the tools panel to apply all the changes at once.

Confirm operation via pop-up to proceed.
3. After addition, you can view your virtual network in the list. The table provides information on all the parameters specified during the tunnel creation as well as a few additional ones:
- ID – unique identifier of the tunnel
- Health Check – basic tunnel status monitoring (hover over for more information)
- Published – shows if the appropriate configs are applied on the server
- Created – the date and time of the tunnel creation
You can click the specific record in the table to view additional information on the endpoints – Virtual IP, External IP, Real External IP, IP, and Interface.
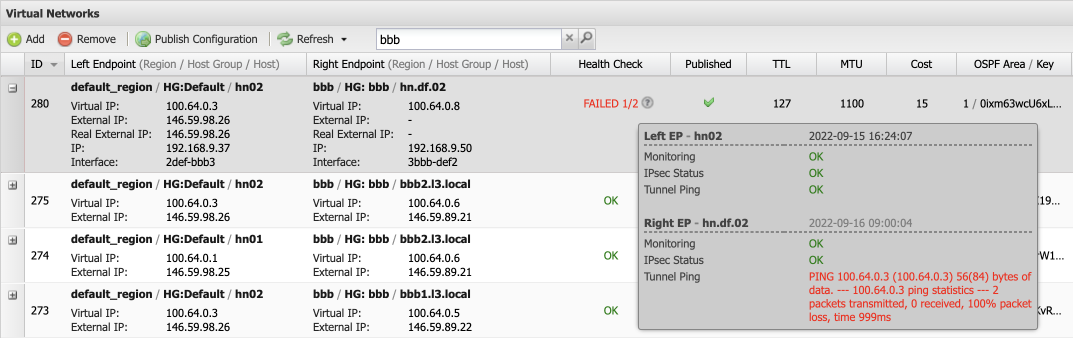
Also, you can hover over the Health Check column for monitoring information.
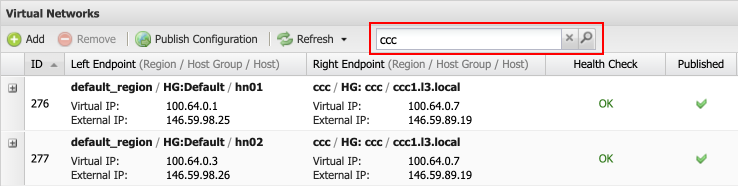
The Refresh button in the tools panel allows manually updating the list at any time (use the drop-down to enable/disable Auto Refresh). The Search field filters displayed results according to the provided string. For example, by the region name:
Be aware that changes made via the admin panel are applied to the hosts only after clicking the Publish Configuration button. It allows making all the required adjustments before applying any changes to the server.
Removing (Editing) Tunnel
Existing records cannot be edited directly. In order to make adjustments, you need to remove (changes won’t be actually applied till published) and re-add the tunnel with new configs.
1. Select a record that is no longer needed (or requires adjustment) and click the Remove button on the tools panel.
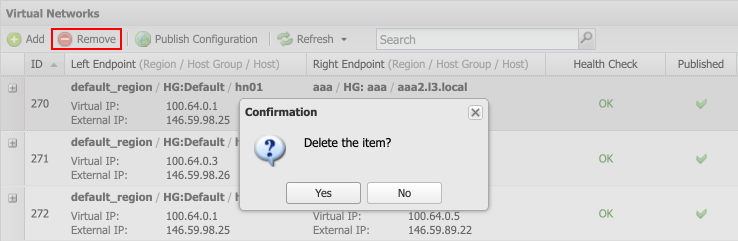
Confirm the item deletion via the pop-up.
2. If needed, re-add the tunnel with updated values.
3. Make any other required changes and apply them with the Publish Configuration button.

Confirm the action, and the platform will apply all the changes.
Additional Information
You can find additional information on the Virtual Network feature in the following documents:
- Utilizing virtual network grouping in the host groups configurations.
- Automatically creating tunnels during the new host addition.